Thursday, November 21, 2019

The C4FM Wires-X System

By accessing the local Wires-X Gateway on the dedicated system, EI2SHD, located in Lower Salthill or on the Galway Fusion Repeater, EI2TBR, it is possible to enjoy high-quality QSOs and news function including overseas stations via the Internet.


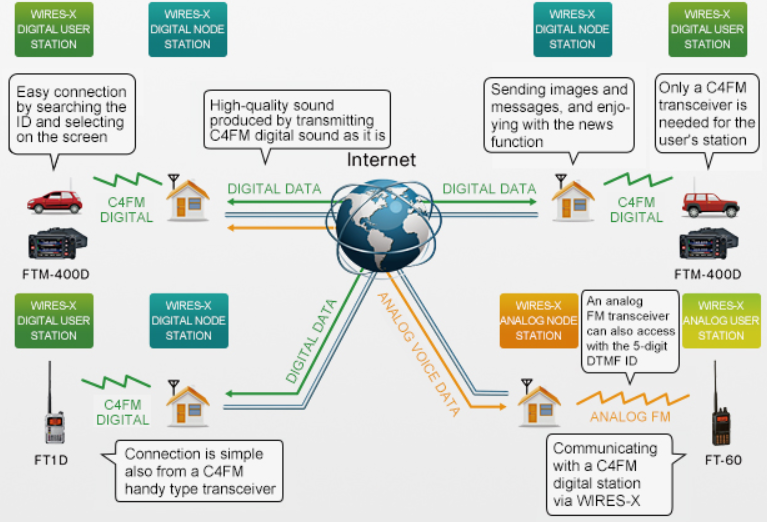
As shown above, there are numerous possibilities from a C4FM transceiver following a very simple access operation. Once initiated it is simple to navigate by following the on-screen instructions.

Using the C4FM transceiver, and accessible node can be found easily.

1) Press the "DX" key. This will send a search signal to the Wires-X Node

This will result in the Identity of the Node appearing on screen. A message "Search and Direct" will appear. Select that and then select all.

Scroll through the list of Nodes available and select the desired area. Next to the Node name in the list there will be a figure which denotes the number of Nodes connected to it. See Below


Select the Node from the list and wait for it to connect. 

Once the node is connected this screen will appear

It is possible to select news items from the screen or press back to place a general call and chat through the system.

So to summarise the following operations can be performed via a Wires-X Node on a Gateway or Via a Repeater fitted with a Wires-X system.


The News facility is fairly basic but nevertheless makes it possible to leave messages or general text items for others to view. It is further possible to upload pictures on this system.

A Node to which you connect may have one or many more Nodes connected to it in a similar fashion to D-Star or DMR Reflectors. Place a call into the Node and it will come out on many other systems connected.


There is always plenty of activity on CQ-UK and, after 9 pm, many Australian stations connect into the UK Node. Normally there are over 20 Nodes connected. America-Link has a huge number of Nodes connected at any one time and would be another good place to initiate a few calls.

The local Galway Fusion Repeater has Wires-X fitted and will allow plenty of scope to use the news and messaging facility between the two stations.

The Wires-X node consists of a Yaesu FTM100D and HRi200 modem. These are interfaced to a computer which runs the Wires-X node Software.


The Node Software runs continuously on the computer. The EI2SHD node is connected into CQ-UK which is further linked to between 19 and 30 other nodes depending on the time of day. Of particular interest is the link to XRF 925A which is a bridge to D-Star. This is also linked to a "Peanut" app which is an Internet radio system.

The screen of a Wires-X node is shown below


It is from this screen that the parameters of the Wires-X node can be set up. The purple bar indicates all the Nodes connected to CQ-UK and which the system is currently connected to. There are a wealth of Nodes that one can connect to located all over the world. America link probably holds the largest collection of Nodes and usually numbers around 110 Nodes. The ALLJA-CQ-Room tends to be the next most populated. CQ-UK tends to be the best Node for semi local contacts.

EI2TBR is connected to CQ-IRELAND which links to DMR TG2724 and is a good location for the occasional EI calls. If you are reading this from outside of Ireland do give a call on TG2724 or CQ-IRELAND if you would like to get an EI contact.

The EI2GCD Mulit-Mode Gateway runs C4FM and is linked to CQ IRL via the IRL Bridge which also links to Brandmeister TG 2724.

EI2SHD the Wires-X Gateway, located in Salthill, is linked to Wires-X Node CQ-UK, This is Node is quite active both day and night.

The Map below show locations of Wires-X Nodes in Ireland. Sadly this mode is under utilised to date. There are two private Wires-X Nodes showing on the map in Donegal and Kilkenny. There is a 70cm Repeater located on Woodcock Hill, Limerick but this has no connection into the Wires-X system. Multi-Mode Digital Repeaters in the Waterford area can run C4FM and have the facility to operate on the YSF or FCS system. If Programmed to YSF-IRELAND an output on CQ-IRELAND will be possible and if Programmed to FCS-004 it is possible to exit on CQ-UK.


For a more in depth view of the Wires-X system Click >>>Here<<<< for the manual.

Friday, November 15, 2019

Reception of Digital Radio on the RTL SDR Receiver

Scanner receivers and are often limited in the areas they can receive. The availability of cheapish Baofeng radios also opened up access to areas of the spectrum but again, coverage was limited. In many cases, commercial users have either migrated to digital systems or have moved to the UHF spectrum and employed digital modes of operation in that area.
.
With this in mind, the RTL2832U + R820T2SDR was purchased as it covers a spectrum from 25 MHz to 1.7 GHz and covers 100 KHz to 30MHz. A package shown below cost only £20.00. The Hack RF SDR would be considered at a later date if initial work on the RTL SDR proved favourable.

The RTL SDR radio is wholly dependant on Software to make it function and there are many variations. There are many programs available, but SDR Sharp was the first program tried. Nowadays, the programs are almost ready to go following installation. It is important to install the USB Driver for he SDR dongle before it will function with the software. There is plenty of documentation on YouTube to assist with the set up so installation was simple. 

The Broadcast band was the first area to test. The miniature antenna was sure to pick up a good range of signals to test the reception and quality. All of the parameters of the receiver are software selectable so bandwidth and gain are important for reception of wideband FM signals.

SDR Sharp was tried initially as it was easy to set up and gave good results straight away with the miniature antenna supplied. This is an excellent program for everyday use on HF, VHF and UHF. It was easy to install and once the driver program Zadig had been run, it required very little to set up.


The next area to test was the Amateur bands. The likelihood or receiving an amateur transmission on VHF or UHF can be pretty slim in Galway By removing the antenna from the SDR receiver, it was possible to receive low power transmissions from the Handheld on both VHF and UHF. Kerchunking the local repeater produced some brief signals.
.
HF reception was possible but the miniature antenna was really not sufficient to make any impact. By connecting a longer length of wire, signals started to appear. An arbitrary length of wire with 9:1 transformer would produce better results. SSB and AM signals were clear and of reasonable quality. Data Modes such as RTTY, PSK were easily received but there are probably software packages to resolve them from a SDR radio. Not really a priority.
.
Digital Radio signals were of more importance but SDR Sharp requires plugins and virtual audio cable and an additional plugin DSD. When these plugins are added in it is possible to decode a wide range of digital voice modes.

Another program, SDRangel was more complex with all of the facilities to decode digital voice signals. Provided that the USB driver has been installed, SDR Angel will work immediately after installation.

To startup, it is necessary to select the device connected, in this case, the RTL SDR, and the reception of Digital Voice transmissions is done via the DSD Demodulator.
For the purpose of initial tests, the SDR radio was set up to receive the output of the hotspot. The hotspot was able to receive DMR, D-Star and C4FM on their respective active channels. 

The Screenshots for the various modes are shown below:
.
DMR operation


In the DMR mode, it may be necessary to tune slightly offset from the centre frequency to decode DMR transmissions. The audio was amazingly clear and the DMR ID appeared on the line just above the constellation graphic. It may be necessary to adjust the tuning very slightly but the waterfall display and the constellation graphic will assist. 

D-Star Operation


D-Star signals were easy enough to tune. Note the Shape on the constellation graph. If centred as shown, the D-Star signal will become audible. It may be necessary to fine-tune the frequency offset very slightly to ensure that the tuning is centred. Again the signals are very clear.

C4FM Operation


C4FM signals were easy to tune and fine-tuning was facilitated by observation of the constellation graphic. Once the signal is centred, the audio became clear.

The next test will be to hook in a more resonant VHF/UHF colinear to the SDR receiver. 

The SDR receiver has many uses:

Full coverage from 100KHz to 1.7GHZ with no gaps.
Broadcast Radio - Reception on HF and VHF 
Decoding RDS signals
DAB Radio Reception
Scanner Receiver 
Air Traffic
Marine Traffic
Public Services  
Decoding Unencrypted Digital Voice - DMR, D-Star, C4FM, P25
Decoding Pager POCSAG/FLEX traffic

Reception and decoding of GPS Signals

Reception of Automatic Dependant Surveillance - Broadcast Mode -S Transponders which broadcast altitude and location information to air traffic controllers. With the appropriate software, these signals can be used to produce a "radar" like display on the computer. ADS-B receiver systems can retail for over £200.00. 

"Plane plotter" is an inexpensive commercially produced application that can be used with an RTL SDR Dongle as shown below

AIS Reception of Marine traffic below:


Monitoring Meteor Scatter
Radio Astronomy

Spectrum analyser 

Panadaptor to sweep the receiver I.F. showing Waterfall display of adjacent channels. Ideal for spotting activity on a quiet band. One could spend fortunes on a unit manufactured for a specific radio but despite all of the frills and facilities, the basis of the unit is an SDR receiver module.

Triangulation of transmitter locations

and so much more ........

All of the above can be performed for just £20.00. However, it is planned to get a more expensive Hack RF system which has the capability to transmit 30mW throughout its coverage up to 2 GHz. The RTL is one of the less sophisticated SDR systems available but is an excellent starting point for experimentation. 

SDRangel is a little more complex with the plugins as an integral part of the program. It is not really designed for the beginner, however, there are plenty of YouTube videos describing the setup and uses of the program. It would be advisable to watch them first. Using one of the simpler SDR programs will give a good insight into SDR Radio before moving on to SDRangel.

If Digital Radio is not the primary interest, try SDR Sharp or Windows Consol V 3.0. There are many more on offer and all basically perform the same task so the choice really should be the one that suits the task. SDR Sharp is a useful program for Panadaptor use when monitoring the I.F. of a transceiver.

Thursday, November 14, 2019

Radioddity GD-73A Review

Measuring a mere 115mm x 50mm x 32mm, the palm-sized Radioddity GD-73A is a fantastic little radio, ideal for operating via a household Hotspot or into a local Repeater. It is a fully functional Tier II DMR Radio running power levels of 0.5 Watts or 2 Watts.


What is in the box

The Radio comes complete with a charging/programming lead which has a standard USB plug on one end and a mini USB on the other, an earpiece with mic and PTT, Battery and USB Charger and 2600mAH Li-Ion battery pack.

The 2600mAH battery provides sufficient power to afford 16 Hours of continuous use or 48 hours on standby. 

It is possible to store 1024 channels in 64 Zones containing 16 channels in each.  

The stability is            +/- 1.0 ppm,
Channel Spacing        12.5 KHz
Modulation                 11K0F2E (Narrow FM)
                                      7K60FXD   12.5 KHz (Data only)
                                      7K0FXE     12.5 KHz (Data & Voice)
Vocoder                       AMBE+2TM 
Modualtion BER         ≤ 5%
Analog Sensitivity      0.35uV/-116 dBM (20dB SINAD)
                                      0.22 uV/-120 dBm (Typical)
Digital Senstivity       0.3uV/-117.4 dBm (BER 1%)
                                      0.22uV/-110 dBm (BER 5%)
Power O/P                   Low 0.5 W High 2.0 W

The unit will need Firmware upgrading to V1.04 and the accompanying CPS Software. After download ensure that the Firmware upgrading software is run as "administrator". It pays to read the extended manual supplied with the software download. Much time was wasted before this was noted.

Once the Firmware is upgraded it is possible to program the radio. 

The CPS is reasonably simple and conforms to other CPS software. After filling in the general settings with Callsign and DMR I/D, Enter Digital Contacts (Name and TG). Next program channels, and then create a Zone for the respective channels. It is necessary to place channels into a receive list otherwise transmission is possible but reception will not occur. Save the CPS and then load into the transceiver. SIMPLE!

Step 1

Fill in the DMR Radio Field with your call sign and the Radio I.D. with your DMR ID. Ensure that TX Time Out is set to 180 seconds as the components of the network time out beyond 3 mins (180 seconds).


Step 2

Enter Talk Groups that you wish to use. Give each on a Name and it will be a Group Call and the Call ID is the Talk Group designated number as shown below.


Step 3

Assign the Channels and their parameters by filling in the following area for each channel.


Step 4

Assign the channels to a Zone. This locates channels into one bank where they can be selected via up-down keys.


Step 5

Fill channels into Receive Group list e.g all Local channels are placed into the EI and UK Receive Group List. 


That completes the programming. Bear in mind that 64 Zones may be programmed with 16 channels in each one. That is a total of 1024. This leaves plenty of scope.

Always save your Code Plug before upgrading the firmware as it may be necessary to reload after the upgrade.

Wot no Keypad? you may ask, but with channels programmed into the device already, the keyboard is seldom used. Programmable buttons P1 and P2 may be assigned to allow navigation and selection of channels in various Zones also selection of High or Low power may be programmed to these keys.

Operation through the hotspot was simple and just a case of selecting the required Zone followed by the selection of the desired channel, using the up-down keys, and then PTT to access. For use via the repeater, selection of 2 Watts is an option although in many cases it was possible to use the low power setting.

The 2600mA will give 16 hours of continuous use or 48 hours of standby time which is more than adequate for most operations.

This is a convenient lightweight handheld to slip in a pocket or bag. The GD-73A has been taken on many trips abroad and kept me in touch with Ireland. The audio out is pleasant and, with the volume turned up full, does not show any signs of distortion. 

As with many DMR handhelds, there are Firmware upgrades from time to time ensuring that bug fixes and modifications are carried out.  These are carried out following consultation with users on the Radioddity pages. 

Whilst not at the top end of DMR equipment, the GD-73 is more than adequate for the average requirements of any user. Good clear audio is a key factor and this radio will provide that facility. At $80 this radio will not break the bank and yet will provide hours of Service. if one is only using a hotspot why pay any more for a DMR Radio. Sadly, it does not come with a drop-in charger but the fact that it can be charged via a mobile phone charger or the laptop USB may be a plus point.

So far anyone who tried out my GD73A was impressed by the ease of operation and programming. Operation through the Repeater network in the Galway area was perfect and a good point to point QSO over 60 Km was possible using 0.5 watts with both stations almost line of sight